Messages les plus consultés

mardi 7 décembre 2010

Lien livre ASP.net MVC !! intéressant

http://aspnetmvcbook.s3.amazonaws.com/aspnetmvc-nerdinner_v1.pdf

Un livre comprenant un seul chapitre de 185 pages, qui figurera dans le livre final appelé“Professional ASP.NET MVC 1.0”, vient d’être proposé au public. Les auteurs sont des personnes connues dans la communauté Microsoft participant activement grâce à la rédaction de billets sur des blogs ou encore aux projets proposés sur codeplex :
Au programme de cet eBook :
  1. Créer une base de données
  2. Construire un modèle avec des règles métiers et de validations
  3. Mettre en œuvre l’inscription de données en utilisant les contrôleurs et les vues
  4. Utiliser le CRUD (Create, Update, Delete) sur le formulaire d’entrée
  5. Manipuler le pattern ViewModel pour passer des informations du contrôleur à la vue
  6. Transformer l’interface utilisateur sur un site utilisant des master pages
  7. Mettre en œuvre la pagination des données
  8. Sécuriser une application à l’aide de l’authentification
  9. Utilisation d’AJAX pour permettre des mises à jour dynamiques
  10. Utilisation d’AJAX pour ajouter une carte interactive
  11. Effectuer des tests unitaires automatisés

jeudi 2 décembre 2010

Introducing WebMatrix


What is in WebMatrix?

WebMatrix is a 15MB download (50MB if you don’t have .NET 4 installed) and is quick to install.
The 15MB download includes a lightweight development tool, IIS Express, SQL Compact Edition, and a set of ASP.NET extensions that enable you to build standalone ASP.NET Pages using the new Razor syntax, as well as a set of easy to use database and HTML helpers for performing common web-tasks.  WebMatrix can be installed side-by-side with Visual Studio 2010 and Visual Web Developer 2010 Express.
Note: Razor support within ASP.NET MVC applications is not included in this first beta of WebMatrix – it will instead show up later this month in a separate ASP.NET MVC Preview - which will also include Visual Studio tooling support for it.

Getting Started with WebMatrix

WebMatrix is a task-focused tool that is designed to make it really easy to get started with web development.  It minimizes the number of concepts someone needs to learn in order to get simple things done, and includes and integrates all of the pieces necessary to quickly build Web sites.
When you run WebMatrix it starts by displaying a screen like below.  The three icons on the right-hand side provide the ability to create new Web sites – either using an existing open-source application from a web application gallery, from site templates that contain some default pages you can start from, or from an empty folder on disk:
image

Create a Web Site using an Existing Open Source Application in the Web Gallery

Let’s create a new Web site.  Instead of writing the site entirely ourselves, let’s use the Web Gallery and take advantage of the work others have done already.
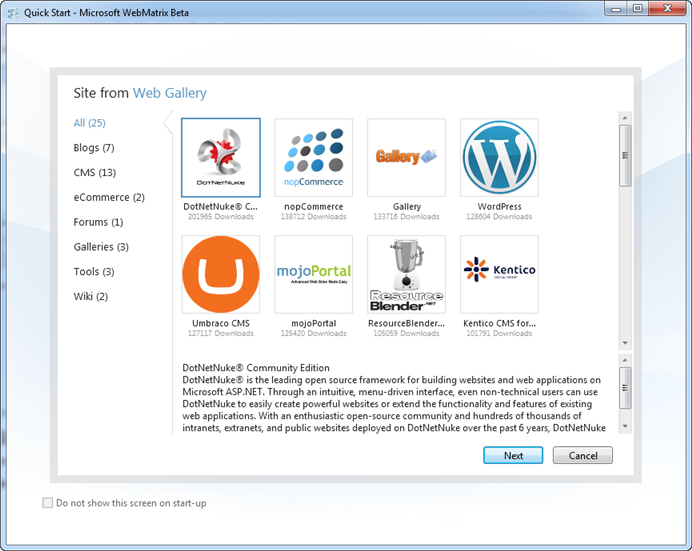
We’ll begin by clicking the “Site from Web Gallery” link on the WebMatrix home-screen.  This will launch the below UI – which allows us to browse an online gallery of popular open-source applications that we can easily start from, tweak/customize, and then deploy using WebMatrix.  The applications within the gallery includes both ASP.NET and PHP applications:
image
We can filter by category (Blog, CMS, eCommerce, etc) or simply scroll through the entire list.  For this first site let’s create a blog. We’ll build it using the popular BlogEngine.NET open source project:
image
When we select BlogEngine.NET and click “Next”, WebMatrix will identify (and offer to download) the required components that need to be installed on my local development machine in order for BlogEngine.NET to run.
IIS Express is included with WebMatrix, so I already have a web-server (and don’t need to-do anything in order to configure it).  SQL Compact Edition is also included with WebMatrix, so I also have a light-weight database (and don’t need to-do anything in order to configure it).  Because SQL Compact is brand new, most projects in the Web Gallery don’t support it yet.  We expect most projects in the Web Gallery will add it as an option though in the future.  If a project requires either SQL Express or MySQL as a database, and you don’t have them installed, they will show up in the dependencies list below, and WebMatrix will offer to automatically download, install, and configure them for you.
PHP applications in the web gallery (like WordPress, Drupal, Joomla and SugarCRM – all of which are there) will download and install both PHP and MySQL.
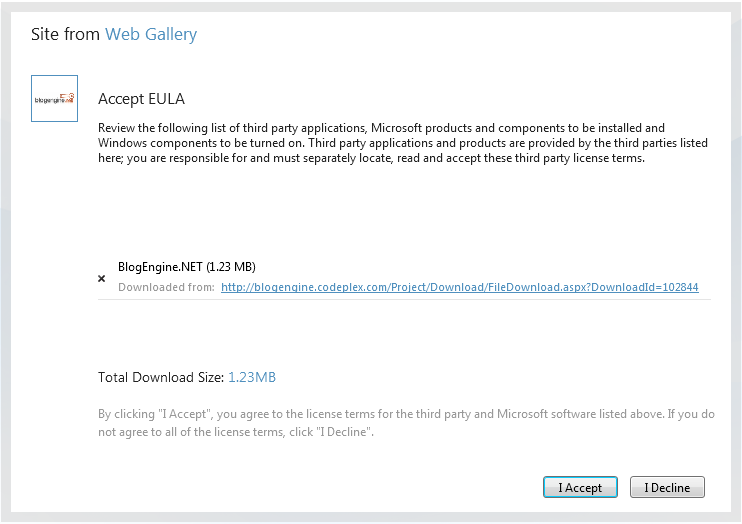
Because I already have SQL Express installed on my machine, the only thing in my download list is BlogEngine.NET itself:
image
When I click the “I Accept” button, WebMatrix will download everything we need and install it on our machine:
image
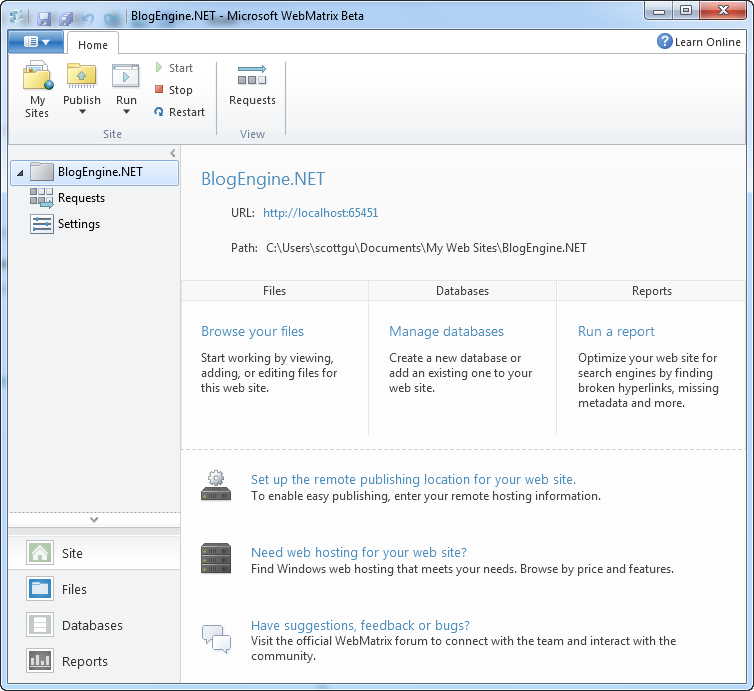
When we click the “OK” button, WebMatrix will open up our new BlogEngine.NET project and display a site overview page for us:
image
This view within WebMatrix provides an overview of the project, and some quick links to-do common things with it (we’ll look at these more in a bit).
To start – we’ll click the “Run” button in the Ribbon bar at the top.  Clicking the “Run” button will launch the site using the default browser you have configured on your system.  Alternatively, you can click to expand the list and pick which installed browser you want to run the site with.  Clicking the “Open in All Browsers” option will launch multiple browsers for you at once:
image
IIS Express is included as part of WebMatrix – and WebMatrix automatically configures IIS Express to run the project when it is opened within the tool (no extra steps or configuration required). 
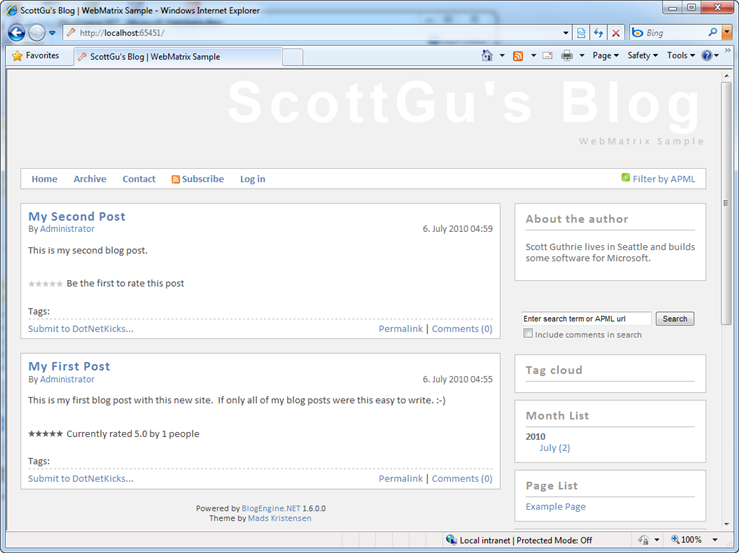
Running BlogEngine.NET will launch a browser and bring up the default page for the application (see below).  BlogEngine.NET by default ships with a home page that includes instructions on how to customize the site:
image
If you read the text it describes how the default adminsitrator password is “admin”/”admin”, and how you can login and customize the look and feel and content of the site.  Let’s login, then use the online admin tool to customize some of the basic settings of the site (the name, about the author, etc) and post two quick blog posts to get the site started:
image
The beauty is that I didn’t have to write any code (nor see any code for that matter) and was able to get the basics of our site up and running in only a few minutes.  This experience is a pretty consistent with all of the other applications within the web gallery.  They are all designed such that you can quickly install them using WebMatrix, run them locally, and then use their built-in admin tools to tweak/customize their core content and structure.
Customizing the Code and Content Further
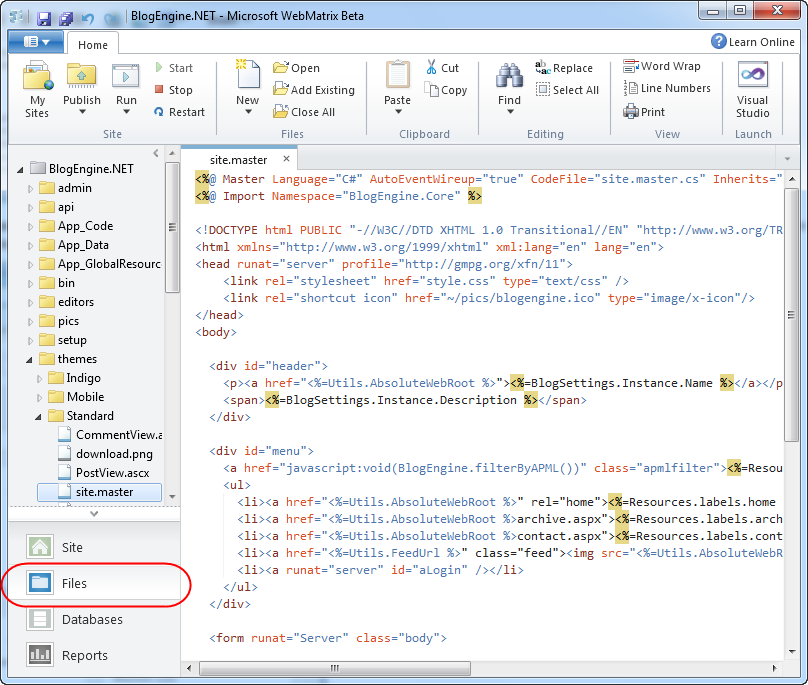
Now that we’ve configured the basics of our blogging site, let’s now look at how we can customize it even further. To-do that let’s go back to WebMatrix and click on the “Files” node within the left-hand navigation bar of the tool:
image
This will open a file-system explorer view on the left-hand side of the tool, and allow us to browse the site, and open/edit/add/delete its files. 
Most of the applications within the web gallery support a concept of “themes” and enable developers to tweak/customize the layout, styling and UI of the application.  Above I’ve drilled into BlogEngine.NET’s “themes” folder and opened the Site.Master file to customize the “standard” theme’s master layout.  We could tweak/customize it, hit save, and then run the site again to see our changes applied (note: pressing F12 is the keyboard short-cut to re-run the application). 

Deploying a Site to a Hoster

WebMatrix provides a lightweight, integrated work environment that allows us to run and tweak sites locally.  After we’ve finished customizing it, and have added some default content to the database, we’ll want to publish it to a hosting provider so that others can access our blog on the Internet. 
WebMatrix includes built-in publishing support that makes it easy to deploy Web sites and Web applications to remote hosters.  WebMatrix supports using both FTP and FTP/SSL as well as the Microsoft Web Deploy (aka MSDeploy) infrastructure to easily deploy sites to both low-cost shared hosting providers, as well as virtual dedicated/dedicated hosting providers.
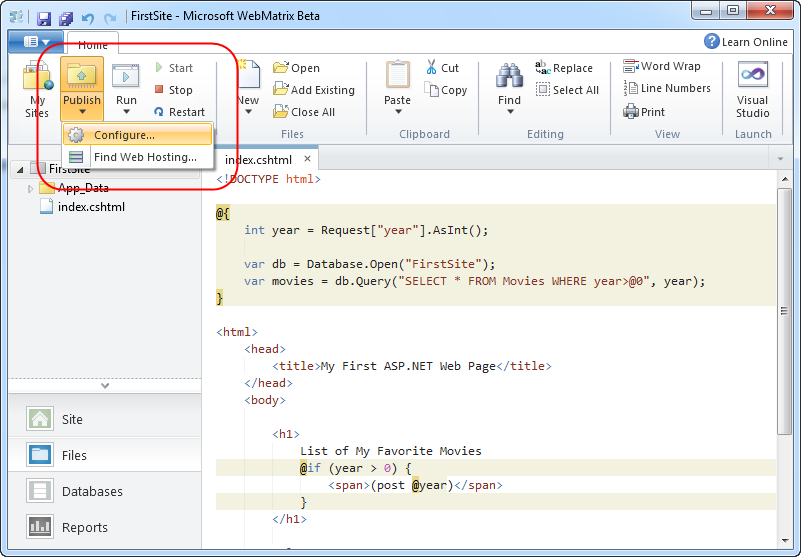
To publish a site using WebMatrix, simply expand the “Publish” icon within the top-level ribbon UI:
image
When we select the “Configure” option it will bring up the following UI that allows us to configure where we want to deploy our site:
image
If you don’t already have a hosting provider, you can click the “find web hosting” link at the top of the publish dialog to bring up a list of available hosting providers to choose from:
image
Hosting providers are now offering Windows hosting plans that include ASP.NET + SQL Server for as cheap as $3.50/month (and these inexpensive offers include support for ASP.NET 4, ASP.NET MVC 2, Web Deploy, URL Rewrite and other features). 
The “find web hosting” link this week includes a bunch of hosting providers who are also offering special free accounts that you can use with WebMatrix – enabling you to try it out at no cost (they also have everything setup to work well on the server-side with WebMatrix and are testing their offers with the WebMatrix publishing tools).
Once you sign-up for a hosting provider, you can then choose from a variety of ways to publish your site to it:
image
FTP and FTP/SSL enable you to easily publish the local files of your site over to a remote server. 
The “Web Deploy” option supports publishing both your site files and the database content – and is the recommended deployment option if your hoster supports it.  When the “Web Deploy” option is selected, WebMatrix will list all of the local databases within your project and provide you with the option to specify the connection-string at the remote hosting provider where your database should be deployed for production:
image
Note: By default BlogEngine.NET uses XML files to store content and settings (and doesn’t require a database).  With the current BlogEngine.NET on the web gallery you can just enter
"Data Source=empty;database=empty;uid=empty;pwd=empty" as the remote database connection string in order to publish the site without needing to setup a database.
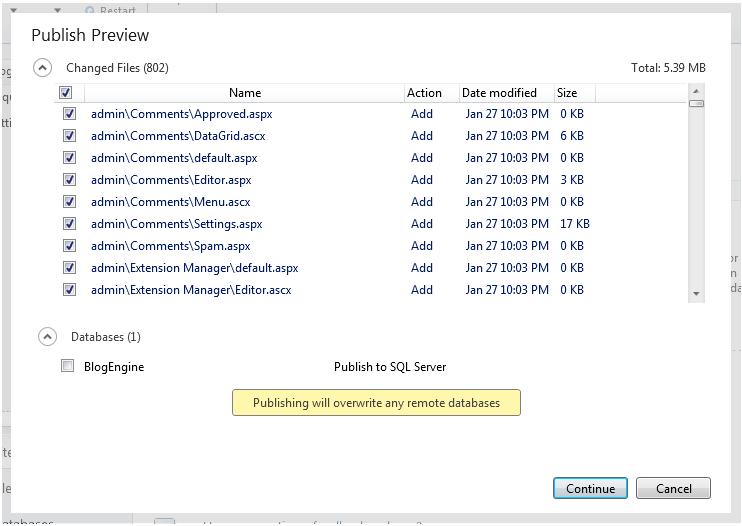
When you click “Publish”, WebMatrix will display a preview of the deployment changes:
image
Note: because BlogEngine.NET doesn’t need a database we’ll keep the database deployment checkbox unchecked.  If we did want to transfer a database we could select it in the publishing preview wizard and WebMatrix will automatically transfer both the site files and the database schema+data to the remote host, deploy the database to the hosting server, and then update your published web.config connection-string to point to the production location. 
Once we click “continue” WebMatrix will start the publishing process for our site, and after it completes our site will then be live on the Internet.  No extra steps are required.
Site Updates
In addition to initial deployments, WebMatrix also supports incremental file updates on subsequent publishes.  Make a change to a local file, click the Publish button again, and WebMatrix will calculate the differences between your local site and your published one and only transfer the files that have been modified (notice that the database by default will not be redeployed to avoid overwriting any data on the remote host):
image
Clicking the “continue” button above will only transfer the one modified file.  This makes updating even large sites easy and fast.

Create a Custom Web Site with Code

I’ve walked through how to create a new Web site using an open source application within the web gallery.  Let’s now look at how we can alternatively use WebMatrix to do some development of a custom site.
The two right-most icons on the WebMatrix home-screen provide an easy way to create a new site that is either based on a simple template of pages, or an empty site with no content:
image
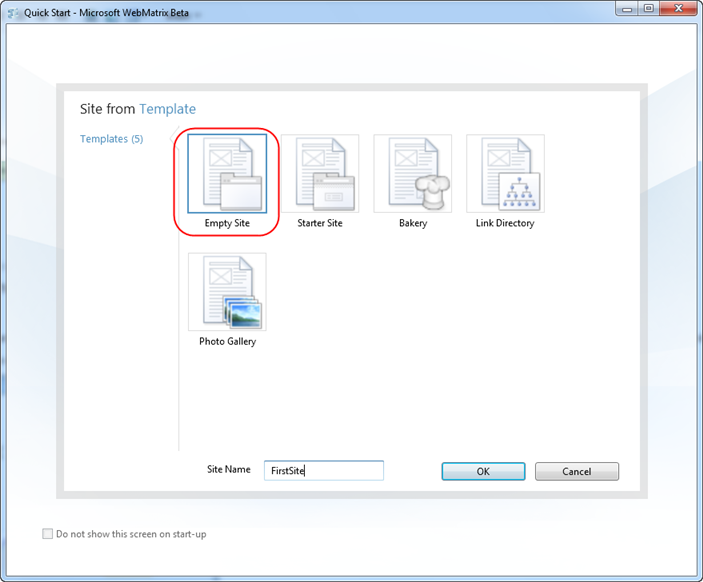
Let’s click the “Site From Template” icon and create a new site based on a template.  We’ll select the “Empty Site” template and name the site we want to create with it “FirstSite”:
image
When we click the “ok” button WebMatrix will load a site for us, and display a site overview page that contains links to common tasks:
image
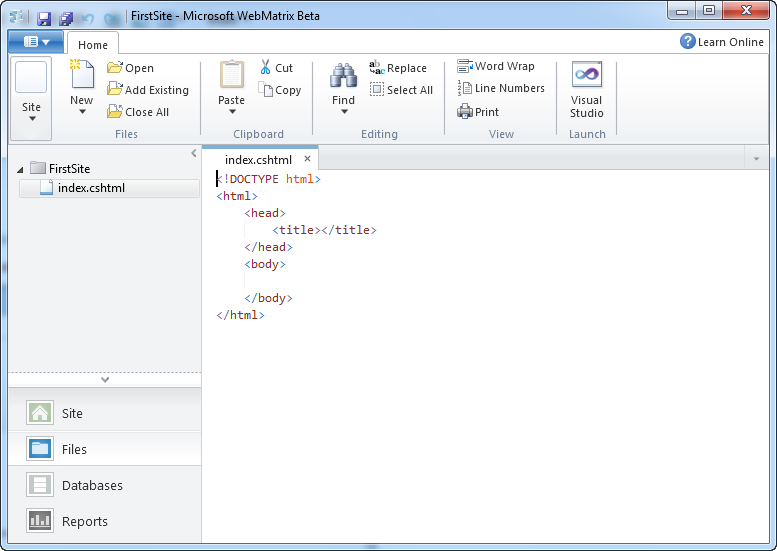
Let’s click either the “Files” icon in the left-hand navigation bar or the “Browse your Files” link in the middle overview-screen. Selecting either of these will show us the file explorer.  The “Empty Site” template actually does have one file in it by default – a file named Index.cshtml.  We can double-click it to open it within the WebMatrix text editor:
image
Files with a .cshtml or .vbhtml extension are ones that use the new “Razor” template syntax that I blogged about last week.  You can use Razor files either as the view files for an ASP.NET MVC based application, or alternatively you can also use them as standalone pages within an ASP.NET Web site.  We are referring to these pages as simply “ASP.NET Web Pages” – and you can add them to both new projects as well as optionally drop them into existing ASP.NET Web Forms and ASP.NET MVC based applications.

Why ASP.NET Web Pages?

ASP.NET Web Pages built using Razor provide a simple, low concept count, way to do web development.  Many people will likely argue that they are not as powerful, nor have as many features, as an ASP.NET Web Forms or ASP.NET MVC based application.  This is true - they don’t have as many features, nor do they expose as rich a programming model.
But they are conceptually very easy to understand, are lightweight to get started with, and for many audiences provide the easiest way to learn programming and begin to understand the basics of .NET development with VB or C#.  ASP.NET Web Pages are also convenient to use when all you need is some basic server scripting and data display/manipulation behavior, and you want to quickly put a site together.

Building our First Simple ASP.NET Web Page

Let’s build a simple page that lists out some content we are storing in a database. 
If you are a professional developer who has spent years with .NET you will likely look at the below steps and think – this scenario is so basic - you need to understand so much more than just this to build a “real” application. What about encapsulated business logic, data access layers, ORMs, etc?  Well, if you are building a critical business application that you want to be maintainable for years then you do need to understand and think about these scenarios.
Imagine, though, that you are trying to teach a friend or one of your children how to build their first simple application – and they are new to programming.  Variables, if-statements, loops, and plain old HTML are still concepts they are likely grappling with. Classes and objects are concepts they haven’t even heard of yet. Helping them get a scenario like below up and running quickly (without requiring them to master lots of new concepts and steps) will make it much more likely that they’ll be successful – and hopefully cause them to want to continue to learn more.
One of the things we are trying to-do with WebMatrix is reach an audience who might eventually be able to be advanced VS/.NET developers – but who find the first learning step today too daunting, and who struggle to get started. 
We’ll start by adding some HTML content to our page.  ASP.NET Web Pages typically start as just HTML files.  For this sample we’ll just add a static list to the page:
image
Just like with our previous scenario, IIS Express has been automatically configured to run the project we are editing – and we do not need to configure or setup anything for our web-server to run our site.
We can press “F12” or use the “Run” button in the Ribbon toolbar to launch it in the browser.  As you’d expect, this will bring up a simple static page of our movies:
image

Working with Data

Pretty basic so far.  Let’s now convert this page to use a database, and make the movie listing dynamic instead of having it just be a static list.
Create a Database
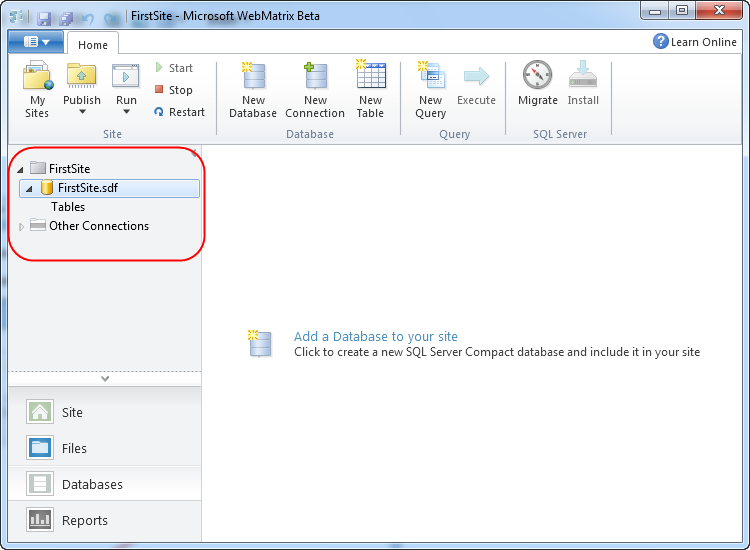
We’ll start by clicking the “Databases” tab within the left-hand navigation bar of WebMatrix.  This will bring up a simple database editor:
image
SQL Server Compact Edition ships with WebMatrix – and so is always available to use within projects.  Because it can be embedded within an application, it can also be easily copied and used in a remote hosting environment (no extra deployment or setup steps required – just publish up the database file with FTP or Web Deploy and you are good to go).
Note: In addition to supporting SQL CE, the WebMatrix database tools below also work against SQL Express, SQL Server, as well as with MySQL. 
We can create a new SQL CE database by clicking the “Add a Database to your site” link (either in the center of the screen or by using the “New Database” icon at the top in the ribbon).  This will add a “FirstSite.sdf” database file under an \App_Data directory within our application directory. 
image
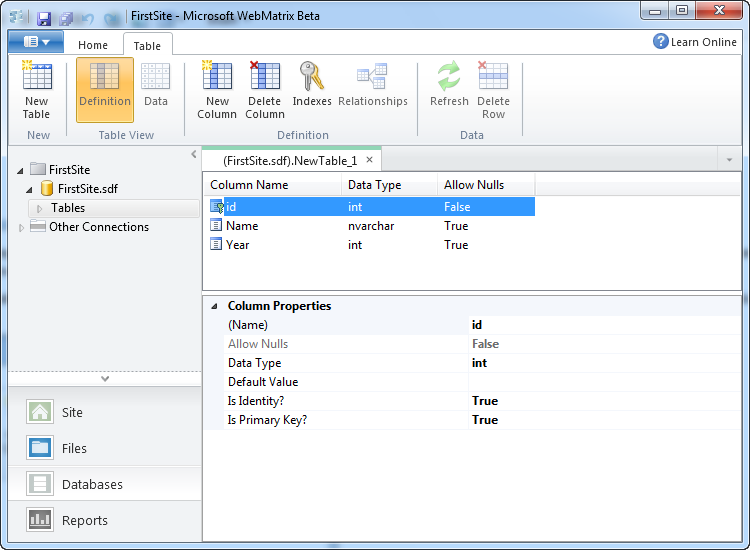
We can then click the “New Table” icon within the Ribbon to create a new table to store our movie data.  We can use the “New Column” button in the Ribbon to add three columns to the table – Id, Name and Year.
Note: for the first beta you have to use the property grid editor at the bottom of the screen to configure the columns – a richer database editing experience will show up in the next beta. 
We’ll make Id the primary key by setting the “Is Primary Key” property to true:
image
We’ll then hit “save” and name the table “Movies”.  Once we do this it will show up under our Tables node on the left hand side. 
Let’s then click the “Data” icon on the ribbon to edit the data in the table we just created, and add a few rows of movie data to it:
image
And now we have a database, with a table, with some movie data we can use in it.
Using our Database within an ASP.NET Web Page
ASP.NET Web Pages can use any .NET API or VB/C# language feature.  This means you can use the full power of .NET within any Web site or application built with it.  WebMatrix also includes some additional .NET libraries and helpers that you can optionally take advantage of for common tasks.
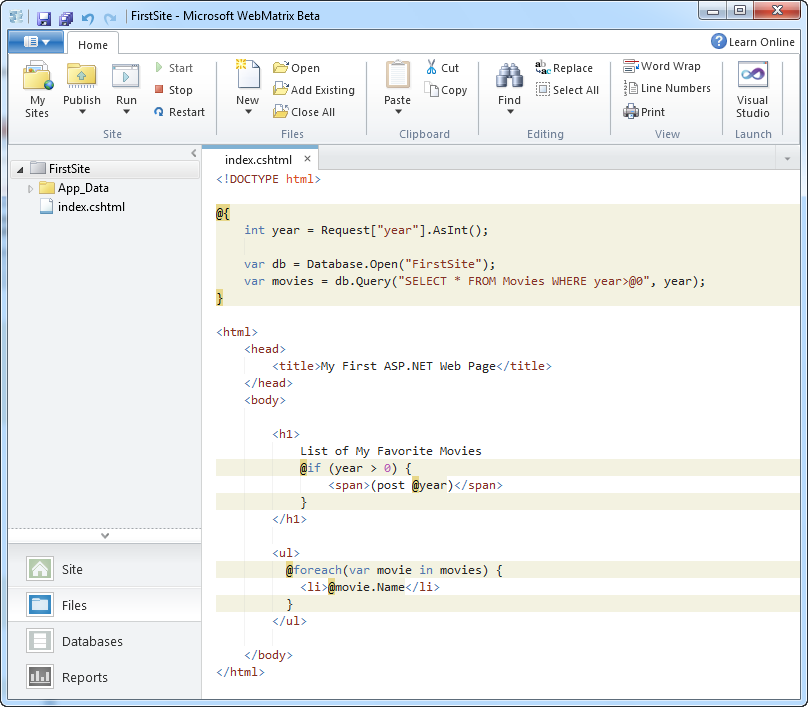
One of these helpers is a simple database API that allows you to write SQL code against a database.  Let’s use it within our page to query our new Movies table and retrieve and display all of the movies within it.  To-do this we’ll go back to the Files tab in WebMatrix, and add the below code to our Index.cshtml file:
image
As you can see – the page is conceptually pretty simple (and doesn’t require understanding any deep object-oriented concepts).  We have two lines of code at the top of the file.
The first line of code opens the database.  Database.Open() first looks to see if there is a connection-string named “FirstSite” in a web.config file – and if so will connect and use that as the database (note: right now we do not have any web.config file at all).  Alternatively, it looks in the \App_Data folder for a SQL Express database file named “FirstSite.mdf” or a SQL Compact database file name “FirstSite.sdf”.  If it finds either it will open it.  The second line of code performs a query against the database and retrieves all of the Movies within it.  Database.Query() returns back an dynamic list – where each dynamic object in the list is shaped based on the SQL query performed.
We then have a foreach loop within our <ul> statement, which simply iterates over the movies collection, and outputs each name as a <li> element.  Because movies is a collection of dynamic objects, we can write @movies.Name instead of having to write movies[“Name”].
When we re-run the page (or just hit refresh on it in the browser) and do a “view source” on the HTML returned to the client, we’ll see the following:
image
The list of movies above is now coming out of our database and is dynamic.
Adding a Simple Filter Clause
One last step we can do to make our application a little more dynamic is to add simple support to filter the list of movies based on a querystring parameter that is passed in. 
We can do this by updating our Index.cshtml file to have a little extra code:
image 
Above we added a line of code to retrieve a “year” querystring parameter from the Request object.  We are taking advantage of a new “AsInt()” extension helper method that comes with WebMatrix.  This helper returns either the value as an integer, or if it is null returns zero.  We then modified our SELECT query to take a WHERE parameter as an argument.  The syntax we are using ensures that we cannot be hit with a SQL injection attack.
Lastly, we added an if statement inside our <h1> which will append a (post 1975) message to the <h1> if a year filter is specified.  And now when we run the page again we will see all movies by default:
image
And we can optionally pass a “year” querystring parameter to show only those movies after that date:
image

Other Useful Web Helpers

I used the Database helper library that ships with WebMatrix in my simple movie listing sample above. 
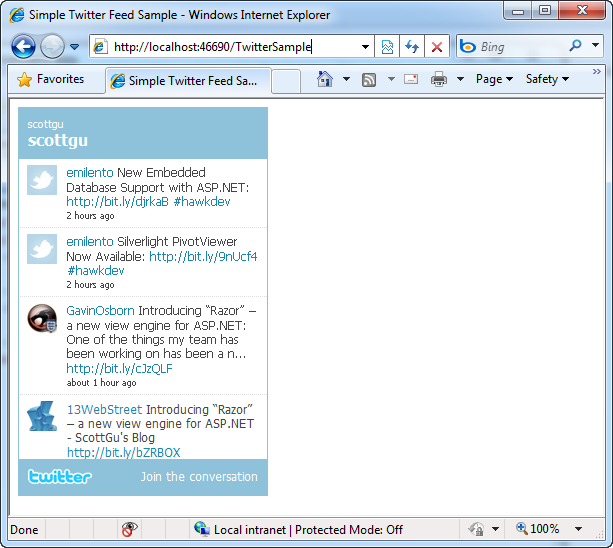
WebMatrix also ships with other useful web helpers that you can take advantage of.  We’ll support these helpers not just within ASP.NET Web Pages – but also within ASP.NET MVC and ASP.NET Web Forms applications.  For example, to embed a live twitter search panel within your application you can write code like below to search tweets:
image
This will then display a live twitter feed of tweets that mention “scottgu”:
image
Other useful built-in helpers include ones to integrate with Facebook and Google Analytics, Create and Integrate Captchas and Gravitars, perform server-side dynamic charts (using the new Chart capabilities built-into ASP.NET 4), and more.
All of these helpers will be available for use not only within ASP.NET Web Pages, but also in ASP.NET Web Forms and ASP.NET MVC applications.

Easy Deployment

Once we are done building our custom site, we can deploy it just like we did with BlogEngine.NET.  All we need to do is click the “Publish” button within WebMatrix, select a remote hosting provider, and our simple application will be live on the Internet.
image

Open in Visual Studio

Projects created with WebMatrix can also be opened within Visual Studio 2010 and Visual Web Developer 2010 Express (which is free).  These tools provide an even richer set of features for web development, and a work environment more focused on professional development.  WebMatrix projects can be opened within Visual Studio simply by clicking the “Visual Studio” icon on the top-right of Ribbon UI:
image
This will launch VS 2010 or Visual Web Developer 2010 Express, and open it to edit the current Web site that is open within WebMatrix.  We’ll be shipping an update to VS 2010/VWD 2010 in the future that adds editor and project-system support for IIS Express, SQL CE, and the new Razor syntax.

How to Learn More

Click here to learn more about WebMatrix.  An early beta of WebMatrix can now be downloaded here
You can read online tutorials and watch videos about WebMatrix by visiting the www.asp.net web-site.  Today’s beta is a first preview of a lot of this technology, and so the documentation and samples will continue to be refined in the weeks and months ahead.  We will also obviously be refining the feature-set based on your feedback and input.

Summary

IIS ExpressSQL CE and the new ASP.NET “Razor” syntax bring with them a ton of improvements and capabilities for professional developers using Visual Studio, ASP.NET Web Forms and ASP.NET MVC.
We think WebMatrix will be able to take advantage of these technologies to facilitate a simplified web development workload that is useful beyond professional development scenarios – and which enables even more developers to be able to learn and take advantage of ASP.NET for a wider variety of scenarios on the web.
Hope this helps,

Introducing IIS Express


Developers today build and test ASP.NET sites and applications using one of two web-servers:
  • The ASP.NET Development Server that comes built-into Visual Studio
  • The IIS Web Server that comes built-into Windows
Both of the above options have their pros and cons, and many ASP.NET developers have told us: “I wish I could have the ease of use of the ASP.NET Development Server, but still have all the power and features of IIS”.  Today I’m happy to announce a new, free option that we are enabling – IIS Express - that combines the best characteristics of both, and which will make it easier to build and run ASP.NET sites and applications.
IIS Express will work with VS 2010 and Visual Web Developer 2010 Express, will run on Windows XP and higher systems, does not require an administrator account, and does not require any code changes to use.  You will be able to take advantage of it with all types of ASP.NET applications, and it enables you to develop using a full IIS 7.x feature-set.

How Things Work Today

Before I get into the details of IIS Express, let’s first quickly review how the ASP.NET Development Server and IIS options work today.
ASP.NET Development Server
Visual Studio’s built-in ASP.NET Development Server (also known as “Cassini”) has the benefit of being light-weight and easy to quickly run.  It doesn’t listen on remote ports (which makes it easier to get approved for many corporate security environments), works even when you are running under a non-administrator account, and doesn’t require a separate installation step. 
The fact that it is so easy to get running is a huge positive of it – and the reason it is the default web-server used by ASP.NET projects in Visual Studio when you press F5 to run them:
image
The downside with the ASP.NET Developer Server, though, is that it does not support a full set of web-server features.  For example, it doesn’t support SSL, URL Rewriting Rules (like the SEO URL Rewrite Rules I blogged about here), Custom Security Settings, and other richer features now offered with IIS 7.
IIS Web Server
IIS is the other option developers use when running and testing their applications with Visual Studio.  You can configure a web project within Visual Studio to use IIS by right-clicking on the project and pulling up its properties (and then by clicking on the “Web” tab within the properties window)":
image
Using IIS as your development server allows you to take full advantage of all web-server features (SSL, URL Rewrite Rules, etc).  IIS is a full-fledged web-server – which means you’ll get an experience closer to what it will work like when you deploy the application on a production server.
The downside with using the IIS option today, though, is that some companies don’t allow full web-servers to be installed on developer machines. IIS also requires administrator account access to setup and debug projects.  Different versions of Windows also support different versions of IIS.  For example, if you are running on Windows XP you have to use the IIS 5.1 web-server that comes with it – which doesn’t support all the new features of IIS 7.x.  Configuring a web project within VS to use IIS also requires some extra installation and configuration steps.

IIS Express – The Best of Both Options

We have been working on a new flavor of IIS 7.x that is optimized for developer scenarios that we are calling “IIS Express”. We think it combines the ease of use of the ASP.NET Web Server with the full power of IIS.  Specifically:
  • It’s lightweight and easy to install (less than 10Mb download and a super quick install)
  • It does not require an administrator account to run/debug applications from Visual Studio
  • It enables a full web-server feature set – including SSL, URL Rewrite, Media Support, and all other IIS 7.x modules
  • It supports and enables the same extensibility model and web.config file settings that IIS 7.x support
  • It can be installed side-by-side with the full IIS web server as well as the ASP.NET Development Server (they do not conflict at all)
  • It works on Windows XP and higher operating systems – giving you a full IIS 7.x developer feature-set on all OS platforms
IIS Express (like the ASP.NET Development Server) can be quickly launched to run a site from a directory on disk.  It does not require any registration/configuration steps. This makes it really easy to launch and run for development scenarios.
VS 2010 Integration
We are enabling IIS Express so that it can be easily used with Visual Studio 2010. You’ll be able to configure VS 2010 to use it instead of the ASP.NET Web Server as the default web-server on ASP.NET Projects.  Like the ASP.NET Development Server today, you won’t need to register a site or virtual directory to use IIS Express. It will support the same usage-model as the ASP.NET Development Server today – just with more feature support.
When you press F5 to run an ASP.NET project, Visual Studio can automatically launch IIS Express and use it to run/debug the application (no extra configuration required).  Like the ASP.NET Web Server, IIS Express will show up in your task-bar tray when running:
image
You can right-click and click “exit” on the icon above to quickly shutdown IIS Express.  You can also right-click and pull up a list of all sites running with it, as well as the directory location and .NET versions they are running under:
image
Two cool things to notice above:
1) The “Test Site” we are running, as well as IIS Express itself, live under the c:\users\[username] folder on disk. This enables non-administrator usage of IIS Express and sites – and enables a bunch of scenarios not possible with the full IIS today (including the ability to run IIS Express in both a locked-down enterprise environment as well as a locked-down school shared computer environment).
2) The “Test Site” we are running above using IIS Express supports both HTTP and HTTPS access.  IIS Express automatically installs a “self-signed certificate” and enables URL ACLs and SSL Certificates for ports so that developers (running as non-administrators on a machine) can use SSL without needing to elevate their accounts or setup any additional configuration.  This enables you to configure secure pages within your applications (like Logon forms) for SSL and run/test them at development time just like they’ll work on your real web-server.
IIS 7.x Feature Set
IIS Express is as easy to run and use as the ASP.NET Web Server you are familiar with today.  But because IIS Express is based on the IIS 7x codebase, you have a full web-server feature-set that you can use.  This means you can build and run your applications just they’ll work on a real production web-server.  In addition to scenarios like SSL, you can take advantage of the IIS 7.x URL Rewriter module, Media Extensions, Dynamic Compression, Advanced Logging, Custom Security and other rich modules now available.
In addition to supporting ASP.NET, IIS Express also supports Classic ASP and other file-types and extensions supported by IIS – which also makes it ideal for sites that combine a variety of different technologies.

Summary

We think IIS Express makes it even easier to build, run and test web applications.  It works with all versions of ASP.NET and supports all ASP.NET application types (including obviously ASP.NET Web Forms and ASP.NET MVC applications).  Best of all – you do not need to change any code to take advantage of it.  You’ll be able to optionally use it with all your current projects today.
We’ll be releasing the first public beta of IIS Express shortly. With the beta you’ll be able to right-click on a file-system folder and have IIS Express launch a web-site based on that file-system location. We’ll also be releasing a patch for VS 2010 and Visual Web Developer 2010 Express later this year that will enable you to automatically launch and use IIS Express in place of VS’s built-in ASP.NET Developer Server.  Future versions of Visual Studio will then ship with this functionality built-in.
Hope this helps,

dimanche 28 novembre 2010

Distribution Linux : comment choisir celle qui vous convient

Distribution Linux : comment choisir celle qui vous convient

Une question qu’on s’est tous posé lors du passage à Linux, et même après, c’est quel est LA distribution que je devrai prendre, celle qui me convient le mieux. Bien sûr, il n’y a pas de réponse systématique, car elle dépends de chacun, mais quelques astuces peuvent aider à faire un choix afin de sauter le pas dans les meilleurs conditions.

Introduction

Il suffit de regarder sur le site de distrowatch.com pour s’apercevoir que ce n’est pas les distributions Linux qu’y manque. Il y en a par centaines ! Et c’est pas toujours facile de s’y retrouver. Et bien prétentieux celui qui dit toutes les connaitre !

Le choix vous appartient

Nous allons voir quelques distributions courantes, avec quelques recommandations, mais au finale, la décision du choix de la distribution vous appartient.
L’un des grand avantage de Linux, c’est bien le choix, la liberté de pouvoir choisir des alternatives, il n’y a pas de meilleur distribution Linux, mais seulement celle qui vous convient le mieux.
Si justement il y en a autant, c’est bien parce que chacune des distributions est unique, et comporte des avantages, et des inconvénients, qui correspond plus ou moins à des personnes, ou plutôt à un usage qu’on pourrait en avoir.

Quel utilisateur suis-je ?

C’est une question qui vaut d’être répondu, car c’est en sachant quel usage on en a besoin, qui va aider à trouver la distribution de son choix, selon les personnes la réponse peut être très varié.
Que vous fassiez vos premiers pas dans le monde du Libre, vos besoin peuvent être différent, dépendant de votre usage vis-à-vis de l’ordinateur, mais des raisons aussi qui vous amène à choisir Linux.
  • Une personne peut préférer une distribution qui fonctionne directement après l’installation « out-of-the-box » comme on dit, sans avoir à chercher quoi que ce soit ou bien même à en comprendre le fonctionnement, du moment que ça tourne au poil.
  • D’autre seront plus enclins à prendre des risques, et voudront même si c’est un début plus de difficultés, peut être parce qu’ils ont plus de temps pour chercher, ou même l’installation ce fait sur un second ordinateur (plus de facilité pour chercher si l’installation ne se passe pas comme prévu).
  • Certaines personnes auront un tout autre usage et viendront dans le monde du Libre par l’acquisition d’un serveur dédié, et souhaite installer dessus une distribution très stable pour leur serveur.
  • Ou encore, vous venez de faire l’acquisition d’un netbook et songé à installer Linux car il existe des distributions optimiser pour les netbook.
  • Les usages ne s’arrêtent certainement pas ici, si vous êtes plus multimédia, ou jeux, ou au contraire côté bureautique.
Tout ses aspects peuvent guider vers le choix de l’une ou de l’autre distributions Linux.

32 bits ou 64 bits ?

Que ce soit l’architecture, ou le nombre de bits, comme Linux est prévu pour fonctionner sur beaucoup d’ordinateurs différent, il existe par ce faite, beaucoup « d’architecture » différentes,
Pour règle général, une version « 32 bits i686″ devrais fonctionner avec tout les ordinateurs pour peut qu’ils ne soit pas ressorti d’un fin fond de placard !
Mais pour le 64 bits, que se soit tout les AMD-64bits, ou les populaire Intel-Core-2-Duo (sortie en 2003), sont tous compatible avec le 64 bits, et donc correspondant à beaucoup d’ordinateur à aujourd’hui. sachant que les programmes sont maintenant très bien supporté pour le 64 bits.

Les Paquetages

Si vous ne savez pas ce qu’un paquetages, la lecture de Foire aux questions : Linux pour les nuls peut vous être utiles.
Les distributions sont aussi avant tout les programmes qu’ils mettent à la disposition via le gestionnaire de paquets, avoir des dépots bien maintenu, à jour, est important, et un choix large de logiciels, pour les plus grandes distributions ce n’est pas vraiment un problème, mais peut devenir plus problématique en cas de distribution peu connu.

Les Bureaux

Il convient également de se faire une idée sur l’environnement graphique (communément appelé bureau) qu’on souhaite avoir. Bien qu’il est toujours possible de changer après, et que de toute façon, les distributions proposent souvent le choix entre les différents bureaux, à l’exemple de Ubuntu/Kubuntu/Xubuntu.
Pour faire simple, on distingue deux grand bureau, qui sont Gnome et KDE, mais il faut savoir qu’un autre plus légé Xfcevaut le coup d’être essayer.
On retrouve aussi des « Window Manager » lorsqu’on souhaite ne pas utiliser tout un complexe de bureau. (mais dans ce guide, ça n’as pas vraiment d’importance).

Quelques Distributions Linux

Maintenant qu’on s’est laisser un peu de temps pour répondre à ces questions, connaître mieux les besoins et usages qu’on à avec l’ordinateur (et oui, avec windows, pas besoin de se poser ce genre de questions… mais en même temps vous n’avez pas le choix ! ) Il est temps de voir quelques un des choix les plus commun !
Comme vous l’aurez compris, je ne vais certainement pas faire une liste complète de toute les distributions Linux, d’une part ça n’aurais aucun sens, et d’autre part ça ne serai d’aucune utilité pour vous.
Il n’est pas toujours facile que d’en donner les avantages et inconvénients des différentes distributions, et parfois même ce sont sujets à de virulentes controverses.

Ubuntu

Une des distributions les plus utilisé par les débutants, impossible de passer à côté, tant par l’engouement des média que par l’internet, si bien que parfois, lorsque certaines personnes ne connaissant pas ce monde, peuvent penser que Linux se limite à Ubuntu (ce qui est faux bien entendu).
Elle est basé sur Debian (unstable), une autre distribution dont la réputation n’est plus à faire.
Ubuntu elle est utiliser par l’assemblé national par exemple.
Des avantages certain, comme le fait d’être facile à l’installation, une très large communauté prête à aider, une bonne documentation.
C’est une distribution très « user-friendly » dans le sens ou de base elle apporte beaucoup d’interface graphique pour aider à administrer le système.
Ubuntu propose une nouvelle version tout les 6 mois, et l’un des reproche les plus souvent fait, c’est que justement la transition d’une version à l’autre ne se fait pas toujours correctement, et qu’il nécessite souvent une réinstallation complète.
Même si beaucoup resteront sur cette distribution des années, je pense que c’est une bonne distribution de transition, et qu’elle n’est pas faite pour un usage un peu poussé.
Il en existe de nombreuses versions, surtout suivant le choix du bureau utiliser.
  • Ubuntu : utilise par défaut le bureau Gnome
  • Kubuntu : utilise par défaut le bureau KDE
  • Xubuntu : utilise par défaut le bureau Xfce
Mais aussi d’autre critère les ont poussé à faire d’autre alternatives :
  • Edubuntu : distribution se voulant éducative
  • Netbook remix : Version spécialiser pour les netbook
  • Server Edition : Version spécialiser pour les serveurs
ubuntu 904 Distribution Linux : comment choisir celle qui vous convient
Ubuntu 9.04 screenshot
kubuntu Distribution Linux : comment choisir celle qui vous convient
Kubuntu 9.04 screenshot
On remarque cette dominante bleu, souvent présente dans les environnements KDE

PCLinuxOS

Une distribution pas encore très connu, mais encore un peu jeune. Leur objectif, est de proposer une distribution pour extrême débutant, certes la communauté est bien moins grande que pour Ubuntu, mais PCLinuxOS propose vraiment une distribution très simple à l’installation et à l’usage, sans pour autant rogner sur l’esthétisme. PCLinuxOS utilise nativement le bureau KDE.
Comme c’est une distribution pas forcément encore très rependu, je ne vais pas m’y attarder, mais elle vaux d’être connu surtout pour un usage par les débutants.
pclos Distribution Linux : comment choisir celle qui vous convient
PCLinuxOS screenshot

Debian

Une distribution très réputé que ce soit pour la stabilité, et elle est souvent proposé pour les serveurs, mais aussi pour sa très large communauté. Elle a acquis une expérience avec le temps puisque c’est une distribution créer en 1993.
Debian est très souvent utilisé comme base à d’autre distribution dont notamment Ubuntu, mais bien d’autre encore. Son système de paquetage est APT (Advanced Packaging Tool), et le choix de paquets n’est certainement pas un problème vu le nombre de programmes qu’ils proposent.
Ici encore on trouve différente version, dont certaine avec des environnement graphique préparer pour l’installation.
Bien que Debian soit un peu plus compliqué que Ubuntu (et encore c’est un peu moins vrai maintenant surtout avec les installations graphique) Cette distribution comporte de réel avantages.
Debian est accessible quand même pour les débutants souhaitant un peu chercher quand même. Mais une fois maitrisé, vous en aurez la satisfaction.
Le choix peut se porter sur une Debian stable, unstable (appeler Sid) ou testing. Bien sûr le choix de stable pour les débuts est judicieux.
debian Distribution Linux : comment choisir celle qui vous convient
Debian 5.0 avec bureau Gnome

Fedora

Encore un grande distribution, qui utilise, contrairement a Debian et Ubuntu, les paquets de Red-Hat (rpm). Fedora se veux généraliste et suffisament simple d’emploi, et n’utilisant que les logiciels libre par défaut. Fedora se veux également accès sur la sécurisation de leur système.
Par défaut, Fedora est proposer avec le bureau Gnome (mais comme souvent, vous avez quand même le choix), et l’esthétisme agréable à l’œil.
Son système de gestionnaire de paquets, le YUM (Yellow dog Updater, Modified) s’utilise soit en ligne de commande soit avec interface graphique.
On peut aussi noter une large communauté francophone bien présente dans la documentation et le forum.
Fedora reste un des incontournable, même si un peu lourd dans leur choix d’application, mais fonctionnel.
fedora Distribution Linux : comment choisir celle qui vous convient
Fedora 11 avec bureau KDE

OpenSUSE

Si le choix de distribution est pour un usage de bureautique, OpenSUSE peut vous intéresser, avec des utilitaires accès bureautique et sécurisé par défaut. Cette distribution à connu un plus grand succès à l’étranger, en allemagne (d’où elle est originaire) mais dans les pays nordique, plutôt qu’en France, ou sa concurante Mandriva à rencontré plus de succès. Elle est donc peut être moins connu et utiliser en France mais reste un incontournable.
Elle utilise aussi le système de paquetage rpm (red-hat paquage manager)
opensuse Distribution Linux : comment choisir celle qui vous convient
OpenSUSE screenshot

Mandriva

Concurrente à OpenSUSE, et d’origine française, elle utilise aussi le système de paquetage rpm, et qui se veux simple d’utilisation.
mandriva Distribution Linux : comment choisir celle qui vous convient
Mandriva screenshot

Gentoo

Si vous avez plusieurs week-end devant vous, que vous n’avez pas peur de passer des heures à peaufiner votre système, que les compilations et lignes de commandes ne vous rebute pas, dans ce cas vous pouvez vous lancer dans Gentoo, mais ce n’est pas une distribution pour débutant. Une fois le système mis en place, (pas mal d’heures à compiler et paramétrer) vous obtiendrai un système performant et stable.

ArchLinux

Je ne pouvais pas terminer cette article sans parler au moins d’ArchLinux, puisque c’est le choix sur lequel je me suis porter.
ArchLinux se veux une distribution simple, dans le sens qu’elle ne garde pas de superflu, mais pas dans la simplicité pour débutant.
Il faut aimer comprendre son système, et les configuration. ArchLinux laisse ne propose par défaut aucun bureau, puisque une fois installer, c’est devant la ligne de commande d’une console, sans interface graphique que vous vous retrouvez.
Mais grace à son gestionnaire de paquet pacman, et même yaourt (qui comporte des fonctions un peu plus avancé) l’installation d’un environnement graphique n’est pas très compliqué, les paquets sont binaire, ce qui permet de passer plus de temps dans les configurations et moins dans les compilations.
C’est une distribution très stable, et très réactive, rapide.
La communauté est réputé pour sa sympathie et son entre-aide, la documentation, et notamment son wiki est plutôt bien fournis.
Pour ceux qui souhaitent en savoir plus sur Archlinux, je vous conseil la lecture de cet article : ArchLinux, une distribution abordable pour les curieux
archinstall Distribution Linux : comment choisir celle qui vous convient
Et voilà ce que vous obtenez après une installation réussi !
Le strict minimum, mais sans surplus.
À vous de faire votre environnement après.
Pour gentoo et archlinux, je n’ai pas mis de screen, car vraiment comme il n’y a pas de bureau par défaut, et comme vraiment on fait ce que l’on veux. Je met ici quand même mon screenshot (sous ArchLinux)
screenshootpetit Distribution Linux : comment choisir celle qui vous convient
Archlinux, avec OpenBox, Pypanel et un conky.
(mon bureau)

Classement selon distro-watch

Pour finir, un petit classement des distributions selon l’année qui viens de passer, personnellement je trouve ce classement sans grand intérêt, mais peut montré l’influence de quelques grandes distributions quand même.
  • Ubuntu
  • Fedora
  • openSUSE
  • Mint
  • Debian
  • Mandriva
  • PCLinuxOS
  • Puppy
  • Sabayon
  • ArchLinux

Conclusion

Beaucoup de distributions sont intéressante, mais je ne pouvais pas tous les mettre ici, mais sachez qu’il y en a d’autre tout aussi performante que celle cité ici.
J’espère que cet article, qui se veux un peu un guide des premiers pas dans le choix d’une distribution de Linux à pu être utile à quelques personnes.
Soit pour se lancer et faire le pas dans le monde Libre ou soit pour motiver dans l’installation d’une autre distribution.